Imagine building powerful AI automations that process your emails, generate content, and manage data — all without writing a single line of code. That is exactly what n8n makes possible, and in this step-by-step tutorial, you will build your first AI-powered workflow from scratch.
Whether you are a marketer looking to automate repetitive tasks, a small business owner wanting to streamline operations, or simply curious about AI automation, this n8n AI automation tutorial for beginners will get you up and running in under an hour.
This AI Tools Hub tutorial walks you through every step — from installation to a fully working AI automation — so you can start automating without touching a single line of code.
What Is n8n and Why Should You Care?
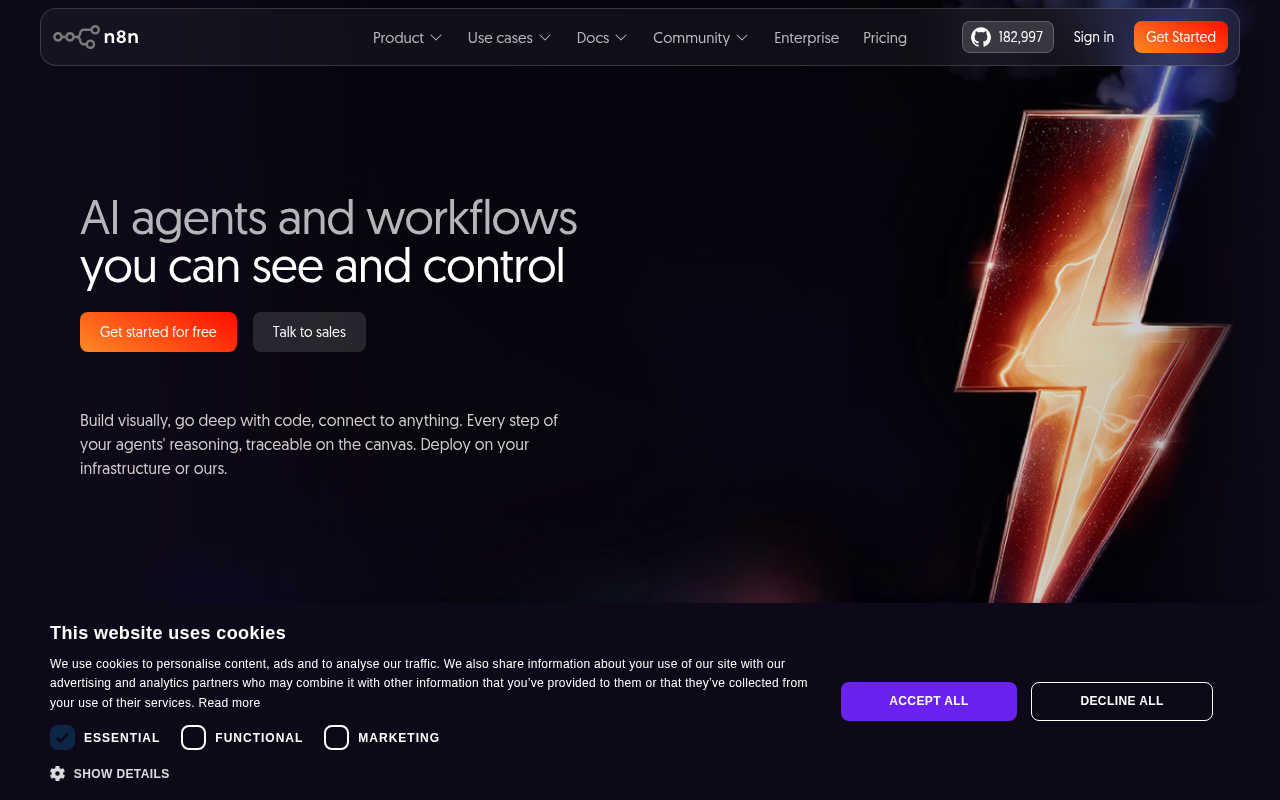
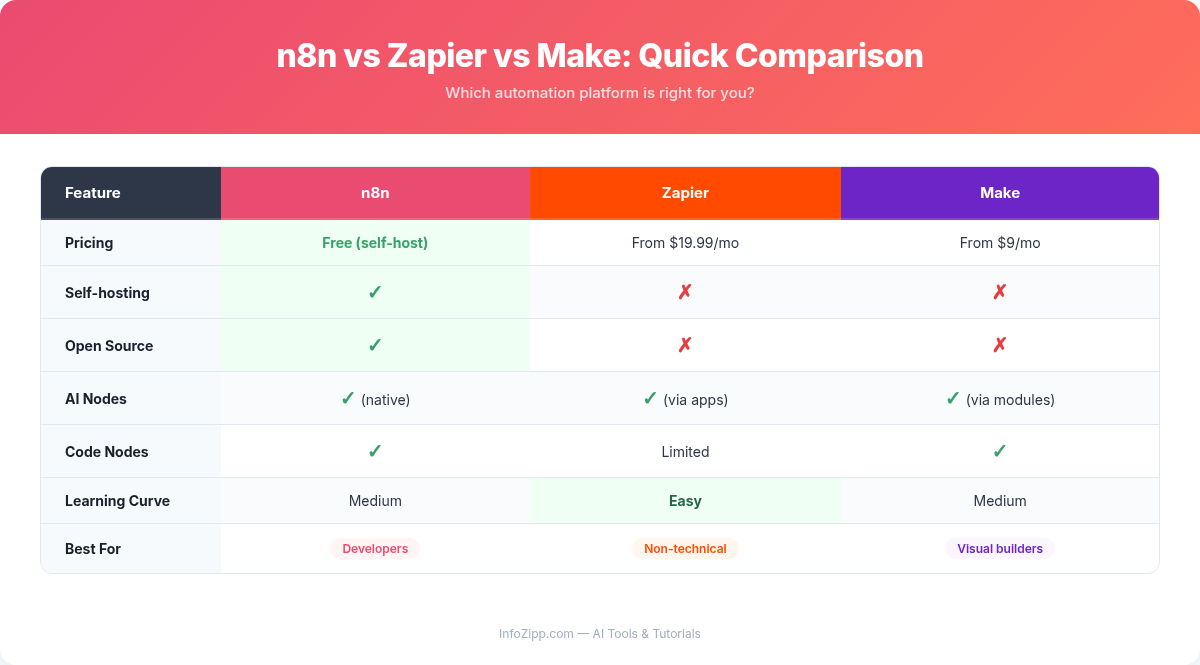
n8n (pronounced “n-eight-n,” short for “nodemation”) is an open-source workflow automation platform that lets you connect apps, services, and AI models through a visual drag-and-drop interface. Think of it as a more powerful, developer-friendly alternative to Zapier or Make — but with a critical advantage: built-in AI capabilities.
Here is why n8n stands out for AI automation in 2026:
- Native AI Agent support: Build intelligent agents that reason, use tools, and make decisions autonomously
- LangChain integration: Connect to OpenAI, Anthropic Claude, Google Gemini, DeepSeek, Groq, and local models through Ollama
- 400+ integrations: Connect AI workflows to Google Sheets, Slack, email, databases, and hundreds of other services
- Open source: Self-host for free with unlimited executions, or use the managed cloud service
- Visual workflow builder: No coding required — build complex AI pipelines by connecting nodes on a canvas
- Active community: Over 181,000 users sharing 8,500+ workflow templates
Getting Started: Cloud vs. Self-Hosted
Before building your first workflow, you need to decide how to run n8n. There are two options:
Option 1: n8n Cloud (Recommended for Beginners)
The fastest way to start. n8n Cloud is fully managed, so there is nothing to install or maintain.
- Go to n8n.io and click “Get Started”
- Sign up with your email or Google account
- You will get a free trial — no credit card required
- Your workspace opens immediately with a blank canvas ready to go
Option 2: Self-Hosted (Free, Unlimited)
If you prefer full control, you can self-host n8n on your own server using Docker. The Community Edition is completely free with no execution limits.
docker run -it --rm \
  --name n8n \
  -p 5678:5678 \
  -v n8n_data:/home/node/.n8n \
  docker.n8n.io/n8nio/n8n
After running this command, open your browser and navigate to http://localhost:5678 to access the n8n editor. For this tutorial, either option works perfectly.
Understanding the n8n Interface
When you first open n8n, you will see the workflow canvas — a blank grid where you build automations by placing and connecting nodes. Here is a quick orientation:
- Canvas: The main workspace where you drag, drop, and connect nodes. You can zoom in/out and pan around freely
- Node panel (left sidebar): Click the “+” button or press N to open the node browser. Search for any app, trigger, or AI node here
- Trigger nodes: These start your workflow — they can be schedules, webhooks, chat inputs, or events from apps like Gmail or Slack
- Action nodes: These do the work — send emails, call APIs, process data, or interact with AI models
- Connections: Drag a line from one node’s output to another node’s input to define the flow of data
- Execute button: Click the “Test Workflow” button at the bottom to run your workflow manually and see results in real time
Pro tip: Each node shows a small preview of its output data after execution. Click any node to inspect the full input and output, which makes debugging straightforward.
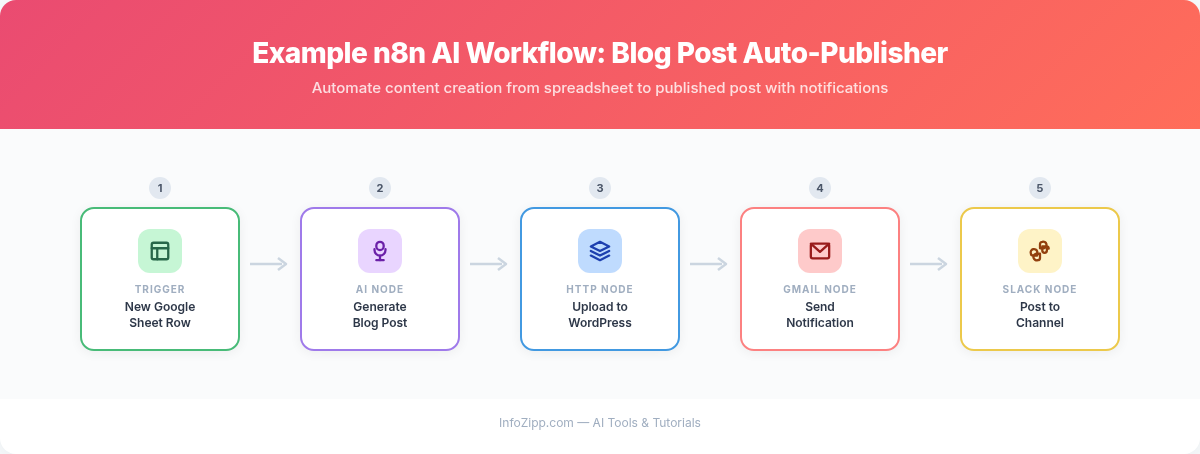
Tutorial 1: Build a “Blog Post Generator” Workflow
Let us build a practical AI workflow that generates blog post drafts and saves them to Google Sheets. This is one of the most popular n8n AI automation use cases, and it requires zero coding.
What This Workflow Does
- Triggers on a schedule (e.g., every Monday at 9 AM) or manually
- Uses an AI model to generate a blog post outline based on a topic
- Expands the outline into a full draft
- Saves the result to a Google Sheets spreadsheet
Step 1: Add a Schedule Trigger
- On your blank canvas, click “Add first step” or press N
- Search for “Schedule Trigger” and select it
- Configure it to run every week on Monday at 9:00 AM (or choose any interval you prefer)
- Close the node settings
Alternatively, you can use a Manual Trigger for testing. This lets you click a button to run the workflow on demand.
Step 2: Add a Set Node for Your Topic
- Click the “+” button on the right side of the Schedule Trigger node
- Search for “Edit Fields (Set)” and add it
- Add a new string field called
topic - Set the value to something like:
10 productivity tips for remote workers
This node defines the blog topic. Later, you can make this dynamic by pulling topics from a spreadsheet or database.
Step 3: Connect an AI Model to Generate the Outline
- Click “+” on the Set node and search for “AI Agent”
- Add the AI Agent node to your canvas
- In the AI Agent configuration, you will see sub-node connections at the bottom for Chat Model, Memory, and Tools
- Click the Chat Model connection and select your preferred provider — for example, OpenAI Chat Model
- Configure the OpenAI node:
- Credentials: Click “Create New Credential” and paste your OpenAI API key
- Model: Select
gpt-4o(orgpt-4o-minifor lower cost)
- Back in the AI Agent node, set the System Message to:
You are an expert blog content strategist. When given a topic, create a detailed blog post outline with:
- A compelling title
- 5-7 main sections with subpoints
- A brief description of what each section should cover
Format the output as structured text.- Set the User Message to:
Create a blog post outline about: {{ $json.topic }}
The {{ $json.topic }} expression pulls the topic from the previous Set node. This is how data flows between nodes in n8n.
Step 4: Add a Second AI Step to Write the Full Draft
- Add another AI Agent node after the first one
- Connect it to the same OpenAI Chat Model (or add a new one)
- Set the System Message to:
You are a professional blog writer. Take the provided outline and write a complete, engaging blog post of approximately 1,500 words. Use a conversational tone, include practical examples, and format with proper headings.- Set the User Message to:
Write a full blog post based on this outline: {{ $json.output }}
Step 5: Save the Output to Google Sheets
- Click “+” on the second AI Agent node
- Search for “Google Sheets” and add it
- Select the operation: “Append Row”
- Connect your Google account credentials
- Select your target spreadsheet and sheet
- Map the columns:
- Column A (Topic):
{{ $('Edit Fields').item.json.topic }} - Column B (Content):
{{ $json.output }} - Column C (Date):
{{ $now.format('yyyy-MM-dd') }}
- Column A (Topic):
Step 6: Test Your Workflow
- Click the “Test Workflow” button at the bottom of the canvas
- Watch the execution flow through each node — each one lights up green when it completes successfully
- Click on the Google Sheets node to verify the data was saved
- Once satisfied, toggle the workflow to Active in the top-right corner
Congratulations — you have just built an AI-powered content generator that runs automatically. The complete workflow has five nodes: Schedule Trigger, Edit Fields, AI Agent (outline), AI Agent (draft), and Google Sheets.
Tutorial 2: Build an “Email Summarizer” Workflow
This second workflow demonstrates a different pattern: reading data from an external source, processing it with AI, and sending a notification.
What This Workflow Does
- Checks your Gmail inbox every 15 minutes for new emails
- Uses an AI model to summarize each email in 2-3 sentences
- Sends the summaries as a Slack message (or email digest)
Step-by-Step Build
Node 1 — Gmail Trigger: Add a Gmail Trigger node. Authenticate with your Google account, set it to check for new emails, and optionally filter by label (e.g., “Inbox” only). Set the polling interval to every 15 minutes.
Node 2 — AI Agent (Summarizer): Add an AI Agent node and connect an OpenAI Chat Model sub-node (or use Anthropic Claude, Google Gemini, or any supported provider). Set the System Message to:
You are an email summarizer. Provide a concise 2-3 sentence summary of the email content. Include the sender, main topic, and any action items. If the email is promotional or spam, simply respond with "SKIP - Promotional email."Set the User Message to: Summarize this email from {{ $json.from }}: {{ $json.text }}
Node 3 — IF Node (Filter): Add an IF node to filter out promotional emails. Set the condition: {{ $json.output }} does NOT contain “SKIP”. This ensures only meaningful summaries pass through.
Node 4 — Slack (Send Message): Add a Slack node. Connect your Slack workspace, select the target channel (e.g., #email-digest), and format the message:
📧 *New Email Summary*
*From:* {{ $('Gmail Trigger').item.json.from }}
*Subject:* {{ $('Gmail Trigger').item.json.subject }}
*Summary:* {{ $json.output }}
Activate the workflow, and you will receive AI-powered email summaries in Slack throughout the day. This is a practical example of how n8n bridges AI processing with everyday communication tools.
Key n8n AI Nodes Explained
n8n’s AI capabilities are built on LangChain integrations. Understanding the core AI nodes will help you design more sophisticated workflows:
AI Agent Node
The centerpiece of n8n’s AI system. The AI Agent implements a ReAct-style reasoning loop — it thinks, acts, observes, and iterates until reaching a final answer. Unlike a simple LLM call, the agent can use tools, make decisions, and perform multi-step tasks autonomously.
Use it when you need the AI to make decisions about what actions to take, not just generate text.
Chat Model (Sub-Node)
This sub-node connects the AI Agent to a language model provider. Supported providers include:
- OpenAI: GPT-4o, GPT-4o-mini, GPT-4 Turbo
- Anthropic: Claude 3.5 Sonnet, Claude 3 Opus, Claude 3 Haiku
- Google: Gemini Pro, Gemini Flash
- DeepSeek: DeepSeek-V3, DeepSeek-R1
- Groq: For ultra-fast inference with open-source models
- Ollama: Run local models on your own hardware
You can switch between providers by simply swapping the Chat Model sub-node — the rest of your workflow stays the same.
Tools (Sub-Nodes)
Tools give the AI Agent the ability to interact with the outside world. When connected, the agent can decide which tools to use based on the task. Available tools include:
- Web Search: Let the agent search the internet for current information
- HTTP Request: Call any API endpoint
- Calculator: Perform mathematical operations
- Code Execution: Run JavaScript or Python code
- Database queries: Read from or write to databases
- Custom tools: Wrap any n8n workflow as a tool the agent can call
Memory (Sub-Node)
Memory allows the AI Agent to retain context across interactions. This is essential for chat-based workflows where the agent needs to remember previous messages.
- Simple Memory: Built-in, stores chat history within the session. Note: this resets when the workflow is saved or n8n restarts — best for testing only
- Postgres/Redis Memory: Persistent storage that survives restarts — recommended for production
- Window Buffer Memory: Keeps only the last N messages to manage context length and costs
5 More AI Workflow Ideas to Try
Once you are comfortable with the basics, here are five more n8n AI automation workflows to expand your skills:
1. Social Media Content Pipeline
Pull trending topics from an RSS feed, generate platform-specific posts (Twitter/X, LinkedIn, Instagram captions) using an AI Agent, and schedule them via Buffer or native platform APIs. Add an approval step with a manual review node before posting.
2. Customer Support Ticket Classifier
Connect to your support platform (Zendesk, Freshdesk, or email). Use an AI Agent to classify tickets by urgency and category, then route them to the right team. Include sentiment analysis to flag frustrated customers for priority handling.
3. Meeting Notes Summarizer
After a Zoom or Google Meet call, trigger a workflow that takes the transcript, generates a summary with action items, and posts it to your project management tool (Notion, Asana, or Trello). Include an AI step that extracts deadlines and assigns tasks automatically.
4. Competitor Price Monitor
Use the HTTP Request node to scrape competitor product pages on a schedule. Feed the raw data to an AI Agent that extracts pricing information, compares it to your prices, and generates a daily report sent to your email or Slack channel.
5. Document Q&A Bot
Upload PDFs or documents to a vector store (Pinecone, Qdrant, or Supabase), then build an AI Agent with a retrieval tool that answers questions based on your documents. Connect a Chat Trigger for a conversational interface — perfect for internal knowledge bases.
Tips for Building Reliable AI Automations
AI workflows can be unpredictable. Here are battle-tested tips from the AI Tools Hub team to make your n8n automations production-ready:
1. Always Add Error Handling
AI API calls can fail due to rate limits, timeouts, or unexpected responses. Use n8n’s Error Trigger node to catch failures and set up retry logic. You can configure each node to retry up to 3 times with a delay between attempts.
2. Use Structured Output Parsing
When you need the AI to return data in a specific format (like JSON), include explicit format instructions in your system prompt. Use n8n’s Code node or JSON Parse after the AI step to validate the output structure before passing it downstream.
3. Set Token Limits and Manage Costs
Each AI call costs money. Set max token limits in the Chat Model configuration to prevent runaway costs. For high-volume workflows, consider using smaller models (GPT-4o-mini, Claude Haiku, or Gemini Flash) for simpler tasks and reserving premium models for complex reasoning.
4. Test with Manual Triggers First
Before activating any scheduled or webhook-triggered workflow, test it thoroughly with a Manual Trigger. Inspect the output of every node. Only switch to automated triggers once you are confident in the results.
5. Version Your Prompts
Your AI prompts are essentially your “code.” Keep track of prompt changes, as small wording tweaks can significantly change output quality. Use n8n’s Workflow History feature (available on Pro plans and above) to revert to previous versions if needed.
6. Log Everything
Add a Google Sheets or database node at the end of your workflow to log every execution — input, AI output, and timestamps. This creates an audit trail and helps you identify patterns when things go wrong.
n8n Pricing: Free vs. Paid Plans
n8n offers flexible pricing that works for individuals and enterprises alike. Here is the current breakdown:
Community Edition (Self-Hosted) — Free
- Unlimited workflows and executions
- Full access to all 400+ nodes including AI nodes
- JavaScript and Python support
- You provide the hosting infrastructure (a basic VPS at $5-10/month works fine)
- No SSO or version control features
Starter (Cloud) — €20/month (billed annually)
- 2,500 workflow executions per month
- 5 concurrent executions
- Unlimited users
- 50 AI Workflow Builder credits
- 1 shared project
- Forum support
Pro (Cloud) — €50/month (billed annually)
- Custom number of workflow executions
- 20 concurrent executions
- 3 shared projects
- 150 AI Workflow Builder credits
- Admin roles and global variables
- 7 days of execution insights
- Workflow history and execution search
Business (Self-Hosted) — €667/month (billed annually)
- 40,000 workflow executions
- SSO, SAML, and LDAP authentication
- 6 shared projects with different environments
- Version control using Git
- 30 days of insights
- Scaling options
Recommendation for beginners: Start with the free n8n Cloud trial. If you hit the execution limits and want unlimited runs, self-host the Community Edition on a cheap VPS. Upgrade to Pro only when you need team collaboration features or workflow history.
Conclusion: Start Automating with AI Today
n8n has lowered the barrier to AI automation to the point where anyone — regardless of technical background — can build sophisticated, production-ready workflows. In this tutorial, you have learned how to set up n8n, build a blog post generator workflow, create an email summarizer, and understand the core AI nodes that power it all.
The key insight is that AI automation is no longer about writing code. It is about understanding what you want to accomplish and connecting the right building blocks. n8n gives you those blocks, and with the two workflows you have built today, you already have a foundation to build on.
Here is what to do next:
- Experiment: Modify the workflows from this tutorial — change the AI model, adjust prompts, or swap Google Sheets for Notion
- Explore templates: Browse n8n’s community template library (8,500+ and counting) for inspiration
- Join the community: The n8n Community forum is incredibly active and helpful for troubleshooting
- Compare tools: See how n8n stacks up against alternatives in our AI automation platform comparisons
The best automation is the one you actually build. Open n8n, start connecting nodes, and let AI handle the work you should not be doing manually.
Explore More on AI Tools Hub
Alex Kim is an AI tools reviewer and tech writer with over 5 years of experience evaluating SaaS and AI products. He specializes in hands-on comparisons of AI writing assistants, coding tools, and productivity software — testing each tool through real-world workflows before publishing any recommendation. His mission at AI Tools Hub is to help readers cut through the hype and find AI tools that actually deliver results.