Custom GPTs are one of the most powerful features OpenAI has ever shipped — and most people have no idea how to use them properly. If you’ve been wondering how to build a custom GPT, this tutorial walks you through every step, from opening the GPT Builder to publishing a polished AI assistant that actually solves real problems.
Whether you want to automate customer support, speed up content creation, or build an internal tool for your team, custom GPTs let you do it without writing a single line of code. They’re the on-ramp to genuinely useful AI — and once you build your first one, you’ll start seeing opportunities everywhere.
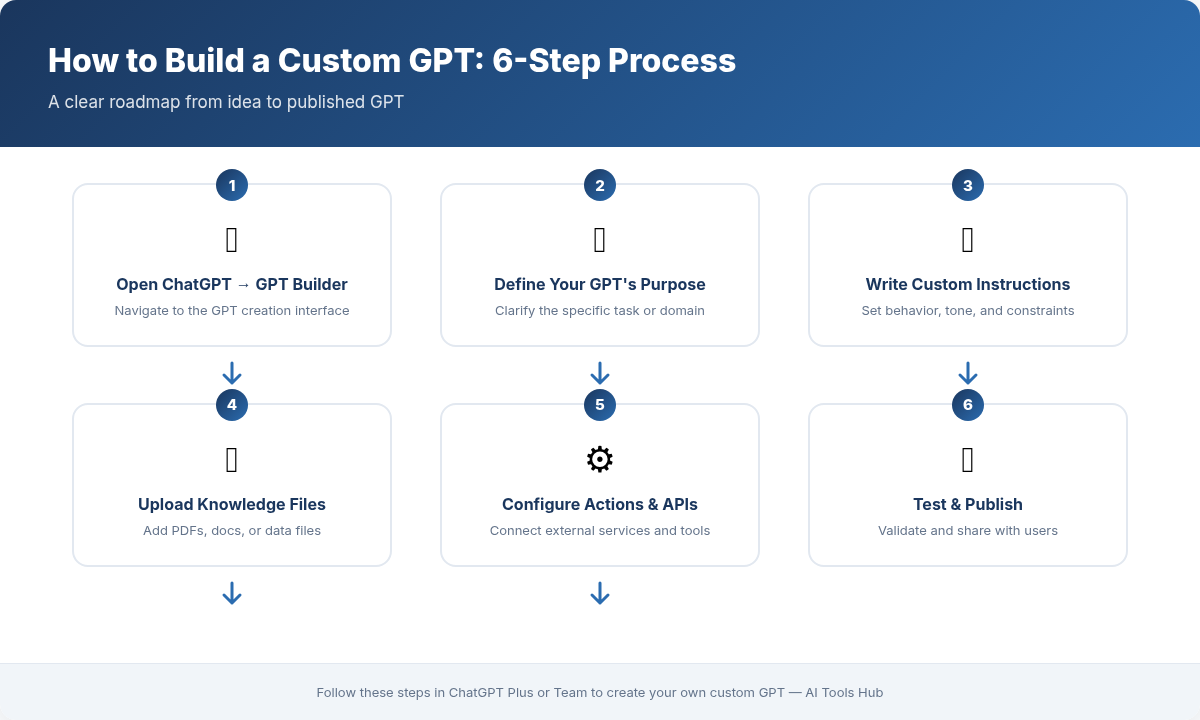
In this guide, we’ll cover everything: accessing the GPT Builder, writing effective instructions, uploading knowledge files, configuring actions, testing, and publishing. By the end, you’ll have a working custom GPT and the confidence to build more.
What Is a Custom GPT (and Why Should You Care)?
A custom GPT is a tailored version of ChatGPT that you configure for a specific purpose. Instead of starting every conversation from scratch with a generic chatbot, you create a specialized assistant that already knows its role, has access to your documents, and can even connect to external services.
Think of it this way: ChatGPT is a Swiss Army knife. A custom GPT is a purpose-built power tool. It’s faster, more accurate, and far more useful for the job you designed it to do.
Here’s why custom GPTs matter in 2026:
- Zero coding required — the entire process is conversational and visual
- Persistent context — your GPT remembers its instructions across every conversation
- Knowledge files — upload PDFs, CSVs, or text files so the GPT draws from your actual data
- Actions — connect to APIs so your GPT can fetch real-time data, send emails, or update databases
- Shareable — publish to the GPT Store or share via link with your team
If you’ve been using ChatGPT and want to level up, building a custom GPT is the single highest-leverage move you can make. For a broader comparison of the major AI platforms, check out our ChatGPT vs Claude vs Gemini comparison.
What You Need Before You Start
Before diving into the tutorial on how to build a custom GPT, make sure you have:
- A ChatGPT Plus, Team, or Enterprise subscription — custom GPT creation requires a paid plan (starting at $20/month)
- A clear use case — know what problem your GPT should solve before you build it
- Your knowledge files ready (optional) — any documents, guides, or data you want the GPT to reference
- API documentation (optional) — if you want your GPT to connect to external services via actions
That’s it. No developer account, no terminal, no dependencies. Just a browser and a plan.
Step 1: Access the GPT Builder
Getting to the GPT Builder takes about three clicks:
- Go to chat.openai.com and sign in with your paid account
- Click on your profile name in the bottom-left corner of the sidebar
- Select “My GPTs” from the menu
- Click the “Create a GPT” button in the top-right corner
You’ll land on the GPT Builder interface, which has two tabs:
- Create — a conversational interface where you describe what you want and the builder helps you set it up
- Configure — a manual interface where you directly edit every setting
The Create tab is fine for quick experiments, but for anything serious, switch to the Configure tab immediately. It gives you full control and avoids the back-and-forth guessing game with the builder bot.
Step 2: Write Effective Instructions
The instructions field is the brain of your custom GPT. This is where you define its personality, behavior, capabilities, and boundaries. Everything your GPT does flows from what you write here.
Anatomy of Great GPT Instructions
Strong instructions cover five areas:
- Role and identity — who is this GPT and what does it do?
- Behavior rules — how should it respond? What tone should it use?
- Task-specific guidance — step-by-step directions for its primary tasks
- Boundaries — what should it refuse to do or redirect?
- Output format — how should answers be structured?
Example: Customer Support Bot Instructions
You are a customer support assistant for [Company Name]. Your role is to help customers with product questions, troubleshooting, order tracking, and returns.
Behavior: Be friendly, concise, and solution-oriented. Never guess — if you don’t know the answer, say so and direct the customer to support@company.com.
Knowledge: You have access to our product catalog, FAQ document, and return policy. Always reference these before answering.
Format: Keep responses under 150 words unless the customer asks for detailed instructions. Use bullet points for multi-step answers.
Boundaries: Do not discuss competitors. Do not make promises about refunds outside the return policy. Do not share internal company information.
Pro Tips for Writing Instructions
- Be specific, not vague — “respond in 2-3 sentences” is better than “be concise”
- Use examples — show the GPT what a good response looks like
- Set priorities — tell the GPT what matters most when instructions conflict
- Iterate — your first draft won’t be perfect. Test and refine repeatedly
The instructions field supports up to 8,000 characters. Use them wisely — more detail generally means better performance, but avoid contradictory rules that confuse the model.
Step 3: Upload Knowledge Files
Knowledge files are what transform a generic chatbot into a domain expert. When you upload documents, your custom GPT can search through them and ground its responses in your actual data instead of its general training.
Supported File Types
- PDF — product manuals, research papers, guides
- DOCX / TXT — internal documentation, SOPs, policies
- CSV / XLSX — product catalogs, pricing data, inventory lists
- JSON — structured data, API responses, configuration files
- Code files (.py, .js, .html, etc.) — reference codebases, style guides
How to Upload
- In the Configure tab, scroll to the “Knowledge” section
- Click “Upload files”
- Select one or more files (up to 20 files, each up to 512 MB)
- Wait for the upload and processing to complete
Knowledge File Best Practices
- Clean your data first — remove headers, footers, and formatting artifacts from PDFs
- Use descriptive file names — “product-catalog-2026.csv” is better than “data.csv” because the GPT sees file names
- Structure for retrieval — use clear headings and sections so the GPT can find relevant passages
- Keep files focused — five targeted documents work better than one massive dump
- Update regularly — stale knowledge files lead to wrong answers
One common mistake: uploading a 200-page PDF and expecting the GPT to handle it flawlessly. Retrieval works better with shorter, well-organized documents. If you have a huge manual, consider splitting it into chapters.
Step 4: Configure Actions (Connect to External APIs)
Actions are what make custom GPTs genuinely powerful. While knowledge files give your GPT static information, actions let it interact with the real world — fetching live data, sending requests, and triggering workflows.
What Actions Can Do
- Pull real-time data from your database or CRM
- Check order status from your e-commerce platform
- Send emails or Slack messages
- Create records in project management tools
- Fetch weather, stock prices, or any public API data
How to Set Up an Action
- In the Configure tab, scroll to “Actions” and click “Create new action”
- Enter your API’s OpenAPI schema (in JSON or YAML format) — this describes the available endpoints
- Configure authentication if required (API key, OAuth, or none)
- Set a privacy policy URL (required for published GPTs)
- Test the action in the preview panel
Example: A Simple Weather Action Schema
Here’s a minimal OpenAPI schema that lets your GPT check the weather:
{
  "openapi": "3.1.0",
  "info": {
    "title": "Weather API",
    "version": "1.0.0"
  },
  "servers": [
    { "url": "https://api.weatherapi.com/v1" }
  ],
  "paths": {
    "/current.json": {
      "get": {
        "operationId": "getCurrentWeather",
        "summary": "Get current weather for a location",
        "parameters": [
          {
            "name": "q",
            "in": "query",
            "required": true,
            "schema": { "type": "string" },
            "description": "City name or coordinates"
          },
          {
            "name": "key",
            "in": "query",
            "required": true,
            "schema": { "type": "string" }
          }
        ]
      }
    }
  }
}
If writing OpenAPI schemas sounds intimidating, don’t worry — you can ask ChatGPT itself to generate one from your API documentation. Just paste the docs and say “Convert this to an OpenAPI 3.1 schema for a custom GPT action.”
Action Tips
- Start simple — get one endpoint working before adding more
- Use descriptive operation IDs — the GPT uses these to understand what each action does
- Add descriptions everywhere — the more context in the schema, the better the GPT uses it
- Handle errors in instructions — tell the GPT what to do if an API call fails
Step 5: Set Conversation Starters and Additional Settings
Before testing, configure a few more settings in the Configure tab:
Conversation Starters
These are the suggested prompts users see when they first open your GPT. Good starters serve two purposes: they show users what the GPT can do, and they guide people toward the tasks your GPT handles best.
For a customer support bot, effective starters might be:
- “I need help with my recent order”
- “What’s your return policy?”
- “How do I set up my new [product]?”
- “I’m having a technical issue with…”
Capabilities Toggles
You can enable or disable three built-in capabilities:
- Web Browsing — lets the GPT search the internet for current information
- DALL-E Image Generation — lets the GPT create images
- Code Interpreter — lets the GPT write and execute Python code, analyze data, and create charts
Only enable what your GPT actually needs. A customer support bot probably doesn’t need image generation. A data analysis GPT definitely needs Code Interpreter.
Profile Picture
Upload a custom image or use DALL-E to generate one. A distinctive profile picture helps your GPT stand out in the sidebar and the GPT Store.
Step 6: Test Your Custom GPT Thoroughly
Testing is where most people cut corners — and it’s exactly where you shouldn’t. The preview panel on the right side of the GPT Builder lets you test in real time as you make changes.
What to Test
- Happy path — does it handle the primary use case correctly?
- Edge cases — what happens with unusual or incomplete inputs?
- Boundaries — does it properly refuse out-of-scope requests?
- Knowledge retrieval — does it find the right information from your uploaded files?
- Action calls — do API integrations work and return useful data?
- Tone and format — does it match the voice and structure you specified?
Testing Workflow
- Test → Identify problems → Update instructions → Test again. Repeat this cycle at least 5-10 times.
- Try to break your GPT intentionally — ask it to do things outside its scope and verify it handles them gracefully.
- Have someone else test it. Fresh eyes catch things you’ve gone blind to.
A common mistake is testing only with the exact prompts you had in mind. Real users will phrase things differently, make typos, and ask follow-up questions you didn’t anticipate. Test broadly.
Step 7: Publish and Share Your GPT
Once testing is complete, it’s time to publish:
- Click the “Save” button in the top-right corner of the GPT Builder
- Choose your sharing setting:
- Only me — private, only you can use it
- Anyone with the link — shareable but not discoverable in the Store
- Everyone — published to the GPT Store for anyone to find
- Click “Save” to confirm
If you publish to the GPT Store, you’ll need:
- A verified domain or builder profile
- A privacy policy URL (especially if your GPT uses actions)
- A clear, accurate description of what your GPT does
After publishing, you’ll get a shareable link. You can embed this in your website, share it on social media, or send it directly to your team.
3 Custom GPT Use Cases (With Configuration Tips)
To spark your imagination, here are three practical examples with specific configuration advice:
1. Customer Support Bot
What it does: Answers product questions, troubleshoots issues, and handles common requests using your company’s documentation.
Configuration:
- Upload your FAQ, product manual, and return policy as knowledge files
- Instructions should emphasize accuracy over helpfulness — it’s better to say “I don’t know” than to hallucinate a wrong answer
- Add an action to check order status via your e-commerce API
- Disable DALL-E and Code Interpreter — they’re not needed
2. Content Writing Assistant
What it does: Helps you draft blog posts, social media captions, and email newsletters in your brand voice.
Configuration:
- Upload a brand style guide and 5-10 examples of your best content as knowledge files
- Instructions should define your tone, target audience, and formatting preferences
- Enable Web Browsing so it can research current topics
- Add conversation starters like “Draft a blog post about…” and “Write 5 LinkedIn post ideas for…”
If you’re looking for prompt ideas to pair with a content assistant, our guide on 20 practical ChatGPT prompts for work is a great starting point.
3. Data Analysis Assistant
What it does: Analyzes spreadsheets, generates charts, and summarizes data trends using natural language queries.
Configuration:
- Enable Code Interpreter — this is essential for data analysis
- Upload reference datasets or data dictionaries as knowledge files
- Instructions should specify preferred chart types, statistical methods, and output formats
- Add starters like “Analyze this CSV and summarize key trends” and “Create a chart comparing…”
Common Mistakes to Avoid When Building Custom GPTs
After building and reviewing dozens of custom GPTs, here at AI Tools Hub we’ve seen the same mistakes over and over. Avoid these and you’ll be ahead of 90% of GPT builders:
1. Vague Instructions
Problem: “Be helpful and answer questions about our product.”
Fix: “You are a support agent for ProductX. When users ask about pricing, reference the pricing-2026.pdf file. Always format prices in USD. If the user’s question isn’t covered in the knowledge files, respond with: ‘I don’t have that information — please contact support@company.com.’”
2. Uploading Too Much Unstructured Data
Problem: Dumping 500 pages of raw documentation and expecting perfect retrieval.
Fix: Curate your knowledge files. Break large documents into focused sections. Use clear headings and consistent formatting.
3. Skipping Testing
Problem: Testing with two prompts and calling it done.
Fix: Test at least 20 different prompts covering normal use, edge cases, and adversarial inputs. Better yet, give the link to a colleague and watch how they use it.
4. Ignoring Conversation Flow
Problem: The GPT gives a perfect first answer but falls apart in follow-up exchanges.
Fix: Test multi-turn conversations. Add instructions for how the GPT should handle follow-ups, clarifying questions, and topic changes.
5. Overcomplicating Actions
Problem: Trying to connect five APIs before the basic GPT works.
Fix: Get the instructions and knowledge files right first. Add actions one at a time, testing each thoroughly before adding the next.
How to Iterate and Improve Your GPT Over Time
Building the GPT is just the beginning. The best custom GPTs evolve based on real usage:
- Review conversations — if you’re using the GPT yourself or sharing it with your team, pay attention to where it stumbles
- Update instructions regularly — add rules for new scenarios you discover
- Refresh knowledge files — keep your data current, especially for product info or pricing
- Track which conversation starters get used — they tell you what users actually want
- Watch OpenAI updates — new features (like improved retrieval or longer context) can dramatically improve your GPT
Think of your custom GPT as a living product, not a one-time project. The builders who iterate weekly build GPTs that people actually come back to.
Frequently Asked Questions
Do I need to know how to code to build a custom GPT?
No. The entire process is visual and conversational. The only exception is if you want to set up actions — you’ll need to provide an OpenAPI schema, but even that can be generated with ChatGPT’s help.
Can I monetize my custom GPT?
OpenAI launched a revenue-sharing program for the GPT Store. If your GPT gains traction, you can earn based on usage. The exact terms vary, so check OpenAI’s latest creator documentation for current details.
How many knowledge files can I upload?
You can upload up to 20 files, each up to 512 MB. For most use cases, 5-10 well-curated files deliver the best results.
Can my custom GPT access the internet?
Yes, if you enable the Web Browsing capability. This lets your GPT search for and reference current information beyond its training data and knowledge files.
What’s the difference between a custom GPT and the Assistants API?
Custom GPTs are no-code and designed for end users via the ChatGPT interface. The Assistants API is a developer tool for embedding AI assistants into your own applications. If you need a quick, shareable tool, build a GPT. If you need full programmatic control, use the API.
Start Building Your First Custom GPT Today
You now have everything you need to build a custom GPT from scratch. The process is straightforward: access the builder, write clear instructions, upload relevant knowledge files, optionally configure actions, test thoroughly, and publish.
The real secret isn’t any one technique — it’s iteration. Your first GPT won’t be perfect, and that’s fine. Build it, test it with real tasks, refine the instructions, and repeat. Within a few cycles, you’ll have an AI assistant that genuinely saves you time every day.
Start with something small and specific. A GPT that answers questions about one product, or helps you draft one type of email. Nail that first, then expand. The best custom GPTs are the ones people actually use — and they all started as simple experiments.
Explore More on AI Tools Hub
Alex Kim is an AI tools reviewer and tech writer with over 5 years of experience evaluating SaaS and AI products. He specializes in hands-on comparisons of AI writing assistants, coding tools, and productivity software — testing each tool through real-world workflows before publishing any recommendation. His mission at AI Tools Hub is to help readers cut through the hype and find AI tools that actually deliver results.