You’ve heard the buzz about AI agents — software that doesn’t just answer questions but actually takes actions, makes decisions, and completes multi-step tasks on your behalf. Until recently, building one required Python scripts, API keys, and a developer’s comfort with debugging error messages at midnight. Not anymore.
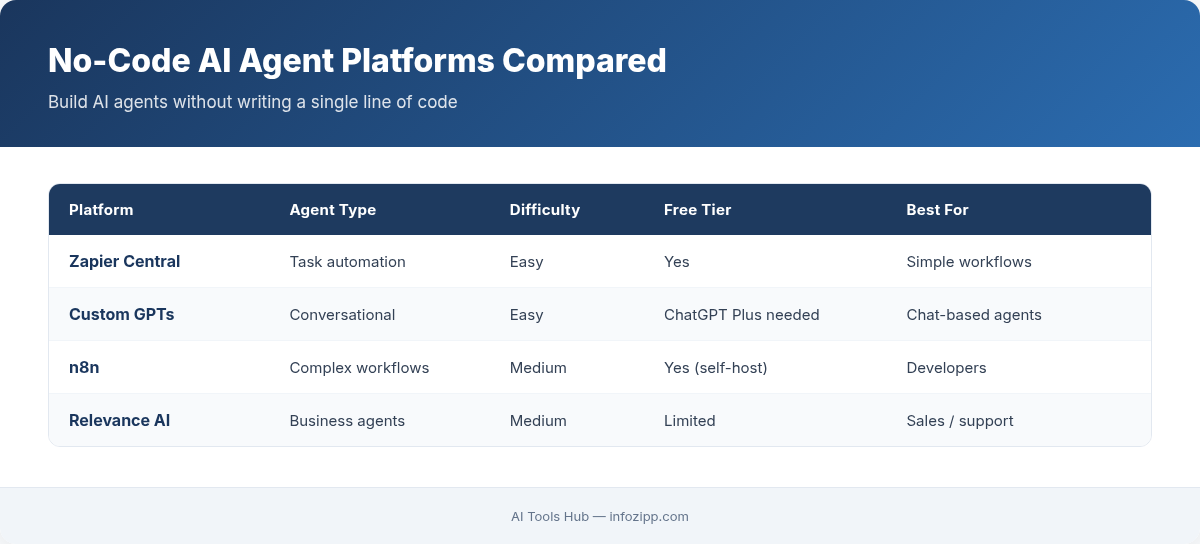
In 2026, you can build a fully functional AI agent using nothing but no-code tools you might already be paying for. This tutorial walks you through building a real, working AI agent step by step using Zapier Central (Zapier’s AI agent platform) and ChatGPT’s Custom GPTs. No coding. No terminal. No prior AI experience required.
By the end, you’ll have an AI agent that monitors your email, identifies action items, drafts responses, and updates your project management tool — all running autonomously in the background.
What Exactly Is an AI Agent? (A Quick Refresher)
Before we build, let’s get clear on what we’re building. An AI agent is different from a simple chatbot or automation in three important ways:
- Autonomy: It acts without you triggering it each time. A chatbot waits for your question; an agent watches for events and responds on its own.
- Reasoning: It makes decisions based on context. Instead of following rigid “if X then Y” rules, an agent uses an LLM (like GPT-4o) to interpret situations and choose the best action.
- Tool use: It connects to external services — email, calendars, databases, Slack — and takes real actions in those tools.
For a deeper dive into the concept, our guide on what agentic AI is and how it works covers the fundamentals in detail.
The agent we’re building today will have all three qualities — and you’ll set it up in under an hour.
What You’ll Need Before Starting
Here’s your supply list. Everything either has a free tier or a free trial:
- Zapier account (free tier works to start; you’ll need a paid plan for live, always-on agents) — zapier.com
- ChatGPT account (free or Plus) — chat.openai.com
- A Gmail or Google Workspace account (for the email trigger)
- A project management tool — we’ll use Notion, but Trello, Asana, or Todoist work too
- About 45-60 minutes of focused time
The total cost if you’re starting from scratch: $0 for testing, approximately $20-30/month if you want it running 24/7 (Zapier’s Starter plan plus ChatGPT’s free tier).
Part 1: Building the Brain — Create a Custom GPT as Your Agent’s Core
Our agent’s “brain” will be a Custom GPT inside ChatGPT. This is where you define its personality, decision-making logic, and expertise. Think of it as writing the job description for your AI employee.
Step 1: Open the GPT Builder
Go to chat.openai.com, click your profile icon, then select “My GPTs” followed by “Create a GPT.” You’ll see the GPT Builder interface with two tabs: Create (conversational setup) and Configure (manual setup). Click Configure — we want full control.
Step 2: Define the Name and Description
- Name: “Email Action Agent” (or whatever you prefer)
- Description: “Analyzes incoming emails, identifies action items, categorizes priority, and drafts appropriate responses.”
Step 3: Write the System Instructions
This is the most important part. Your instructions tell the GPT how to think and what to do. Paste the following into the Instructions field and customize the bracketed sections:
You are an Email Action Agent. When given the text of an email, you perform the following analysis:
1. Categorize the email: [Meeting Request / Action Required / FYI Only / Urgent / Spam/Marketing]
2. Extract action items: List every specific task or request mentioned in the email. If there are no action items, say “No action items.”
3. Assess priority: Rate as High, Medium, or Low based on urgency and sender importance.
4. Draft a response: Write a professional, concise reply. Match the tone of the original email. If no response is needed, say “No response needed.”
5. Suggest a project task: If there’s an action item, format it as a task title and due date suggestion.
Always respond in this exact JSON format:
{“category”: “…”, “action_items”: [“…”], “priority”: “…”, “draft_response”: “…”, “task_title”: “…”, “task_due”: “…”}
Why JSON format? Because Zapier can parse JSON output and route each field to different actions. This structured output is what transforms a chatbot into an agent — it creates machine-readable decisions that other tools can act on.
Step 4: Test Your GPT
Before connecting it to anything, test it in the Preview panel. Paste a sample email:
“Hi, just a reminder that the Q2 budget report is due by Friday. Can you also send me the updated headcount numbers when you get a chance? Thanks.”
Your GPT should return structured JSON with the category (Action Required), two action items (budget report, headcount numbers), priority level, a draft response, and a task suggestion. If it doesn’t, refine your instructions until the output is consistent.
Step 5: Save and Publish
Click Save and set visibility to “Only me” (unless you want to share it). Note the GPT’s name — you’ll reference it in Zapier.
For a more detailed walkthrough of the GPT Builder, see our full How to Build a Custom GPT tutorial.
Part 2: Building the Body — Set Up Zapier Central as the Action Layer
Now we give our agent hands. Zapier Central is Zapier’s dedicated AI agent platform (distinct from regular Zaps). It lets you create agents that use AI reasoning to decide which actions to take and when.
Step 6: Open Zapier Central
Go to central.zapier.com and sign in. Click “Create Agent.”
Step 7: Configure the Agent’s Behavior
In the agent setup, you’ll define:
- Agent name: “Email Processor Agent”
- Instructions: “You monitor my Gmail inbox. When a new email arrives, analyze it for action items and priority. For high-priority emails with action items, create a task in Notion and draft a response in Gmail. For medium-priority, create a task only. For low-priority or FYI emails, do nothing.”
These natural-language instructions are what make Zapier Central different from traditional Zaps. You’re not building a flowchart — you’re describing behavior, and the AI figures out the logic.
Step 8: Connect Your Data Sources (Triggers)
Click “Add Data Source” and connect:
- Gmail: Authorize your Google account. Set it to monitor your primary inbox (you can filter by label later).
This is your agent’s “eyes” — it watches for new emails and feeds them to the AI brain.
Step 9: Connect Your Actions
Click “Add Action” and connect the tools your agent can use:
- Gmail — Send Draft: The agent can create draft replies in your Gmail (it won’t send automatically unless you allow it — we recommend starting with drafts)
- Notion — Create Database Item: Connect your Notion task database. Map the fields: Task Title, Due Date, Priority, Source (“Email”), and Notes (for the action item details)
- Slack — Send Message (optional): If you want the agent to notify you about high-priority emails in a specific Slack channel
Step 10: Set Decision Logic
In the agent’s instructions, add decision rules that refine its behavior:
Decision rules:
– If priority is HIGH and there are action items: Create Notion task AND draft Gmail response AND send Slack notification
– If priority is MEDIUM and there are action items: Create Notion task only
– If priority is LOW or category is FYI/Spam: Take no action
– Never auto-send emails. Always create drafts for my review.
– For meeting requests: Create a Notion task with “Schedule: [meeting topic]” as the title
The beauty of Zapier Central is that these rules are interpreted by AI, not executed as rigid code. If an email is technically “low priority” but contains an urgent tone, the agent can bump it up — just like a human assistant would.
Part 3: Connecting Brain to Body — Make Them Work Together
Now here’s where it gets powerful. You can enhance Zapier Central’s built-in AI reasoning by combining it with your Custom GPT for more sophisticated analysis.
Step 11: Add a ChatGPT Action in Zapier Central
In your Zapier Central agent, add another action:
- ChatGPT — Conversation: Connect your OpenAI account. In the message field, use the template: “Analyze this email: [email body from trigger].” Set it to use your Custom GPT’s instructions (you can paste your system prompt here if the direct GPT connection isn’t available).
This adds a layer of structured analysis. The email comes in, gets analyzed by your Custom GPT logic for categorization and action items, and then Zapier Central uses those results to decide which actions to take.
Step 12: Test with a Real Email
Send yourself a test email from a different account:
Subject: “Urgent: Client presentation moved to Wednesday”
Body: “Hi, the client presentation has been moved from Friday to Wednesday at 2 PM. We need to finalize the slide deck by Tuesday EOD. Can you handle slides 5-10 on the competitive analysis section? Also, please book the large conference room.”
Within a few minutes, your agent should:
- Detect the new email
- Categorize it as “Action Required” / High Priority
- Create a Notion task: “Finalize slides 5-10 (competitive analysis) — Due: Tuesday EOD”
- Create a second Notion task: “Book large conference room for Wednesday 2 PM”
- Draft a Gmail response confirming you’ll handle those items
- Send a Slack notification about the priority email (if configured)
If something doesn’t work, check the Zapier Central logs — they show exactly what the AI “thought” at each step, making debugging straightforward.
Expanding Your Agent: 5 No-Code Upgrades
Once your basic agent is running, here are ways to make it smarter:
1. Add calendar awareness. Connect Google Calendar as a data source. Now your agent can check your availability when drafting responses to meeting requests and suggest specific times.
2. Build a “VIP sender” list. Add a Google Sheet with VIP email addresses. Instruct the agent to always treat emails from those addresses as high priority regardless of content.
3. Weekly digest automation. Create a second agent (or add a scheduled behavior) that reviews all tasks created during the week and sends you a Monday morning summary in Slack.
4. Multi-channel monitoring. Add Slack and Microsoft Teams as data sources so your agent monitors messages across platforms, not just email.
5. Learning from corrections. When you edit a draft the agent created before sending it, save the original and edited versions to a Google Sheet. Periodically review the patterns and update your agent’s instructions to match your style better.
For readers who want to explore other automation platforms (including free, self-hosted options), our comparison of n8n vs Zapier vs Make breaks down the key differences.
Common Mistakes and How to Avoid Them
After helping readers at AI Tools Hub build their first agents, here are the pitfalls we see most often:
Mistake 1: Instructions that are too vague. “Handle my emails well” gives the AI no framework for decision-making. Be specific: define categories, priority levels, and exactly what actions to take for each scenario.
Mistake 2: Letting the agent send messages automatically from day one. Always start with drafts and review. Once you’ve verified the agent’s judgment over 50+ emails, you can selectively enable auto-sending for low-risk categories (like confirming meeting times).
Mistake 3: Not testing edge cases. Send yourself emails in different languages, with attachments, with no clear action items, and from unknown senders. See how the agent handles ambiguity before trusting it with your real inbox.
Mistake 4: Building too much at once. Start with email-to-task only. Once that’s reliable, add draft responses. Then add Slack notifications. Layering incrementally lets you isolate problems.
Mistake 5: Forgetting about privacy. Your emails pass through OpenAI and Zapier’s servers. Don’t use this agent for emails containing sensitive personal data, health information, or confidential business data unless your organization’s policies explicitly allow it.
Where to Go from Here
You’ve just built something that would have required a development team two years ago: an autonomous AI agent that monitors, reasons, decides, and acts. And you did it without writing a single line of code.
The email agent is a foundation. The same architecture — AI brain (Custom GPT) + action layer (Zapier Central) + connected tools — can power agents for:
- Sales: Monitor CRM for new leads, research the company, draft personalized outreach
- Customer support: Triage incoming tickets, suggest knowledge base articles, escalate urgent issues
- Content creation: Monitor trending topics, draft social media posts, schedule them for review
- Recruiting: Screen incoming resumes against job requirements, schedule interviews, send follow-ups
The no-code AI agent space is evolving fast. Zapier Central, ChatGPT’s GPT Builder, and platforms like Make and n8n are all racing to make agent-building more accessible. The best time to start experimenting is right now — while the learning curve is gentle and the competitive advantage is real.
Build your first agent this week. Start with something simple. Let it run for a few days. Then make it smarter. That’s the loop that turns a curiosity project into a genuine productivity multiplier.
Alex Kim is an AI tools reviewer and tech writer with over 5 years of experience evaluating SaaS and AI products. He specializes in hands-on comparisons of AI writing assistants, coding tools, and productivity software — testing each tool through real-world workflows before publishing any recommendation. His mission at AI Tools Hub is to help readers cut through the hype and find AI tools that actually deliver results.